
工事中
X code
自己署名証明書/無料 七日問題/Mac Os
Home Twitter Lobi Yay! Discord YouTube
Special thanks iPoGo team
If you are attempting XCode installation, you are on your own, use google for any help you may need as our staff has nothing to do with XCode: Here is a link
If you dont know what this stuff means or if you are on windows and dont already know how to make a virtual machine you should move on
1. Download Xcode (from App Store, free download but 7.8GB)
2. Download iOS App Signer (from https://dantheman827.github.io/ios-app-signer/)
3. Open Xcode
4. Create new Xcode project (Shift + Cmd + N) > Single View Application
5. Fill out Product Name > Organisation Name > Organisation Identifier
6. Select the folder the .ipa is on
7. Select the top most name on the left hand side bar
8. Navigate to Signing & Capabilities (top bar on project side window)
9. Select team or add an account (for adding you need to add your Apple ID with your actual password)
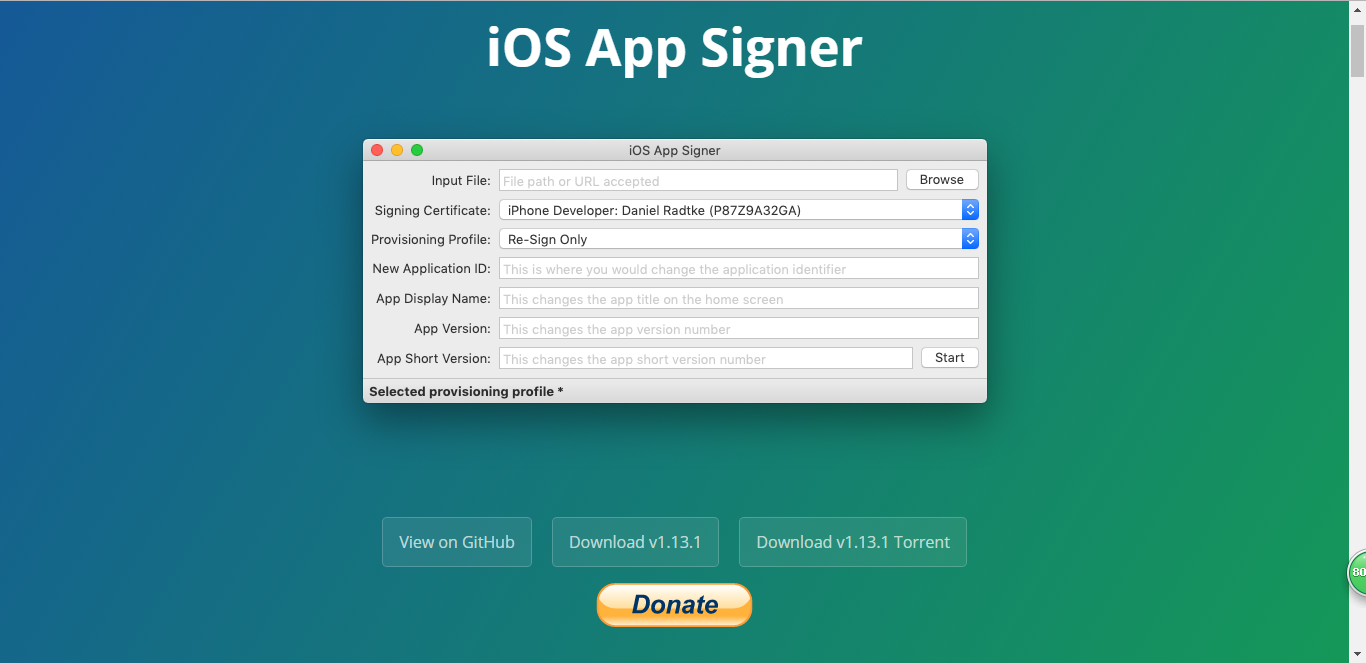
10. If it doesn’t show any errors open iOS App Signer
11. Select the .ipa > change signing certificate to Apple Development if yours is on iPhone > select the profile created with Xcode
12. Press start
13. Input a new name for file
14. Go back to Xcode
15. Select Window > Devices and Simulators (Shift + Cmd + 2)
16. With your device connected, under Installed Apps, select the + and the file generated by the app signer.
17. Once it’s done installing, on your device go to Settings > General > and trust the profile like usual when impacting
18. Enjoy.
If you are having trouble installing and are getting an error message similar to unable to install Turn off Re-Sign only in IOS app signer
X code ダウンロード
▼App Store
https://apps.apple.com/jp/app/xcode/id497799835?ls=1&mt=12
▼Developer
https://developer.apple.com/downloads/index.action?name=Xcode
iOS App 署名者をダウンロード
http://dantheman827.github.io/ios-app-signer/
X code 開く
新しい X code プロジェクトを作成(Shift + Cmd + N)>シングルViewアプリケーション
⑤製品名を入力>組織名>組織識別子
⑥ipaがあるフォルダーを選択
⑦左側の一番上の名前を選択 サイドバー
⑧署名&機能(プロジェクトサイドウィンドウのトップバー)に移動します
⑨チームを選択するか、アカウントを追加します(追加するには、実際のパスワードでApple IDを追加する必要があります)
⑩エラーが表示されない場合 iOS App Signerを開きます
App 署名者
⑪ipaを選択[ iPhoneの場合は署名証明書をApple Developmentに変更します]Xcodeで作成されたプロファイルを選択
⑫スタート押します
⑬ファイルの新しい名前を入力します
⑭Xcodeに戻る
⑮Window→デバイスとシミュレーター(Shift + Cmd + 2)
⑯デバイスを接続した状態で、[インストール済みアプリ]とアプリ署名者が生成したファイルを選択します。
⑰インストールが完了したら、端末で[設定]> [一般] 通常どおりプロファイルを信頼します